mercredi 1 janvier 2020

Welcome !


Welcome to my blog !

First of all I will make a short presentation : I am a french student in a Mechanical Engineer School called Supméca Paris and my courses include CATIA manipulation. I wanted to learn more about this powerful tool and especially about CATIA macro. But I was disapointed to discover how few tutorials about macro programming there were. That's why I would like to share some informations I collected in creating basics tutorials.

In this blog you will thereby find tutorials about programming macro in CATIA V5 of course. But I planned to add a few Mechanical Design tutorials as well.

Finally, in the download section, you can find personnal macro (VBA Excel and VBA CATIA V5) and CATParts/products. When data are needed for an exercice, a link will redirect you to this section and to the proper message.

dimanche 24 novembre 2013

Part Design

Well, now you can create sketches, let use them in Part Design workbench.


1) Basic features

-Creating a pad

Let's tell that your part is opened. Your sketch is called My_Sketch and you want a pad of 20mm height. The code is the following :


'Get the part
Dim My_Part as Part
Set My_Part = CATIA.AcctiveDocument.Part

'Get the part body in the part, assuming your main body is called PartBody
Dim My_Body As Body
Set My_Body = My_Part.Bodies.Item ( "PartBody" )

'Create the pad
Dim My_Pad As Pad
Set My_Pad = My_Part.ShapeFactory.AddNewPad ( My_Sketch, 20.000000 )

My_Part.Update


-Creating a pocket

It's the same start, the only change is the following :

Dim My_Pocket As Pocket
Set My_Pocket= My_Part.ShapeFactory.AddNewPocket ( My_Sketch, 20)

My_Part.Update

Similary :

-Creating a shaft : use AddNewShaft


dimanche 9 juin 2013

3D Printer : Electronical part

Finally we have printed our printed circuit card ! It's a Gen7 (link here) and we are now trying to weld the composants.


In the same time, we will install the first firmwares. The programming language used is called Arduino and the primal firmware is Teacup.

mercredi 29 mai 2013

3D Printer Project

I belong to the robotic club of my engineering school and we have a new project. It is divided in two part : first build a 3D Printer, then print chess pieces that we have modelised with CATIA V5.

The 3D Printer name is Prusa Mendel from this website http://reprap.org/wiki/.

A Prusa Mendel
For the moment we haven't done the electronic part, only the mechanical. But we will print our printed circuit soon.

As regards the modelisation part, we have for the moment designed three pieces. They should represent some important tools or symbols of science in general.

The first achieved piece is the tower :


Click here if you want to download it.

The pawn should be a LED but the design is still under discussion.


The bishop is likely to be a engine or a part of it.

Next step

lundi 6 mai 2013

Quick overview of VBA

This article recap the basics things you can do with VBA.


  • The code is read from top to bottom, with loops or not
  • You have to totally build the user interface through a userform (insert/userform) and add buttons, labels...
  • VBA could be considered as an oriented object programming language as well and you have methods, properties, functions, sub...
1) Userform


Tip : F5 to see how your userform looks like


To add a userform : insert/userform in your VBA Project

You can enlarge the userform, add other controls...If the little window with controls doesn't appear, just click on toolbox in your toolbar.

Useful Methods and properties :
  • your_userform.Caption : the name that appears on the top of the userform (it's not the intrinsic name of the userform, which is your_userform.Name)
  • your_userform.StarUpPosition (choose the initial position of your userform)
  • your_userform.Show : show the userform...
  • Userform_Initialize() : this sub is run when your userfom appears
2) Label


This is a text, which can't be modified by the user.


Useful Methods and properties :
  • label1.Caption : modify the text
  • label1.Font : change the backround color
  • label1.Visible = True (or False) Tell if the label is shown to the user or not (useful for no-intrusive error message)


3) Textbox


It's possible to enter a text or a number in a textbox.

Useful Methods and properties :
  • textbox1.Text or textbox1.Value : return the expression, which is type in the textbox (it's a string expression. Nothing typed equals to "" )
  • textbox1.Font


4) Command button


It allows to run an action, when selecting the button


Useful Methods and properties :
  • CommandButton1.Caption : to control the button text


5) Image


Add a picture in your userform (bmp, jpg or gif)

Useful Methods and properties :
  • Image1.Picture : select the image you want to show with the syntax : Image1.Picture = LoadPicture("your_path\your_image.jpg")
  • Image1.Autosize : automaticaly resize your image
Image1.PictureSizeMode=fmPictureSizeModeClip
(let your image unchanged)
Image1.PictureSizeMode=fmPictureSizeModeStretch

(enlarge and deform your image to fit to your frame)
Image1.PictureSizeMode=fmPictureSizeModeZoom
(enlarge your image with no deformation)


6) Listbox


It's possible to display a list, from which you can select an object

Useful Methods and properties :
  • listbox1.AddItem "text" : add an item in the list
  • listbox1.Clear : erase all values
  • listebox1.RemoveItem(listbox1.Listindex) : remove the n-1 item (where n=listbox1.Listindex)
  • listbox1.ListCount : number of values available on the list
  • listbox1.Text or Value : to get the selected element
  • listbox1.List(n) : to get item n in the list

7) Checkbox and option box


- Checkbox : activate an option
- Optionbox : allow to pick up only one option among others (you have to gather them in a same frame)


Useful Methods and properties :

  • checkbox1.Caption
  • checkbox1.Value / optionbox1.Value : if ticked = True else = False


For further information, follow this links :
In french
In english

Memento : Main type of data

Numeric :


Non numeric :


Interacting with the user :

Other than the userform there are pre-formatted interface.

  • MsgBox
Simple MsgBox :


MsgBox "Your message" 


Error MsgBox :


MsgBox "Are you sure?",vbOKCancel + vbCritical, "Question"


You can get the result in a variable ( result=MsgBox "Are you sure?",vbOKCancel + vbCritical, "Question")

Information MsgBox :


MsgBox "Just click on OK", vbInformation, "Question"


Exclamation MsgBox :


MsgBox "Be careful", vbExclamation, "Error"


  • InputBox
syntax : Inputbox (message,title,default. value)


nb_part = InputBox("How many parts do you want ? :", "Part creation", 2)


Back to the summary
Back to the tutorial

dimanche 5 mai 2013

Modifiying a sketch : Examples and exercices

I told you how to add a sketch and only a sketch. Now I present you some examples and exercices to modify sketches.

WARNING : If you want to use the macro recorder, don't forget to leave the sketch mode by the exit workbench button, or nothing will be recorded.

First, here you have the basic lines, which are needed every time, with the two alternatives :

  • With the sketch directly in the main body
sub your_sub()

Dim CATIA As Object

On Error Resume Next
Set CATIA = GetObject("CATIA.Application")
If Err.Number <> 0 Then
 Set CATIA = CreateObject("CATIA.Application")
 CATIA.Visible=True
End if
On Error GoTo 0

Dim myDocument As Documents
Set myDocument = CATIA.documents

Dim partDocument1 As partDocument
Set partDocument1 = myDocument.Add("Part")

Dim part1 As part
Set part1=partDocument1.Part

Dim bodies1 As Bodies
Set bodies1 = part1.Bodies

Dim body1 As Body
Set body1 = bodies1.Item("PartBody")

Dim sketches1 As Sketches
Set sketches1 = body1.Sketches

Dim originelements1 As OriginElements
Set originelements1 = part1.OriginElements

Dim reference1 As Reference
Set reference1 = originelements1.PlaneXY

Dim sketch1 As Sketch
Set sketch1 = sketches1.Add(reference1)

Dim factory2D1 as Factory2D
Set factory2D1 = sketch1.OpenEdition

sketch1.CloseEdition

part1.Update

End sub


  • With the sketch in your geometrical set


sub your_sub()
Dim CATIA As Object

On Error Resume Next
Set CATIA = GetObject("CATIA.Application")
If Err.Number <> 0 Then
 Set CATIA = CreateObject("CATIA.Application")
 CATIA.Visible=True
End if
On Error GoTo 0

Dim myDocument As Documents
Set myDocument = CATIA.documents

Dim partDocument1 As partDocument
Set partDocument1 = myDocument.Add("Part")

Dim part1 As part
Set part1=partDocument1.Part

Dim hybridBodies1 As HybridBodies
Set hybridBodies1 = part1.HybridBodies

Dim hybridBody1 As HybridBody
Set hybridBody1 = hybridBodies1.Item("Geometrical Set.1")

Dim sketches1 As Sketches
Set sketches1 = hybridbody1.HybridSketches

Dim originelements1 As OriginElements
Set originelements1 = part1.OriginElements

Dim reference1 As Reference
Set reference1 = originelements1.PlaneXY

Dim sketch1 As Sketch
Set sketch1 = sketches1.Add(reference1)

Dim factory2D1 as Factory2D
set factory2D1 = sketch1.OpenEdition

sketch1.CloseEdition

part1.Update

End sub

You can just copy/paste this code.

Now it's possible to modify this sketch. I suppose that the sketch is in your geometrical set (the code with the sketch directly in the body is slightly the same)

First I make a short list of the useful items in the sketch mode :


'To create a point
Dim point2D1 As Point2D
Set point2D1 = factory2D1.CreatePoint(your_H_coordinate, your_V_coordinate)

'To create a line
'Create the line using this command line

Dim line2D1 As Line2D
Set line2D1 = factory2D1.CreateLine(first_point_H_coordinate, first_point_V_coordinate, second_point_H_coordinate, second_point_V_coordinate)

'To create a circle

Dim circle2D1 As Circle2D
Set circle2D1 = factory2D1.CreateClosedCircle(center_H_coordinate, center_V_coordinate, radius_of_your_circle)

'To create a spline
'A spline needs control points instead of simple points
'Create a spline with three control points like this :


Dim controlPoint2D1 As ControlPoint2D
Set controlPoint2D1 = factory2D1.CreateControlPoint(H1, V1)

Dim controlPoint2D2 As ControlPoint2D
Set controlPoint2D2 = factory2D1.CreateControlPoint(H2, V2)

Dim controlPoint2D3 As ControlPoint2D
Set controlPoint2D3 = factory2D1.CreateControlPoint(H3, V3)

'The CreateSpline function needs a CATSafeArrayVariant according to the help

'Create an array of object like this

Dim arrayOfObject1(2)
Set arrayOfObject1(0) = controlPoint2D1
Set arrayOfObject1(1) = controlPoint2D2
Set arrayOfObject1(2) = controlPoint2D3


Dim spline2D1 As Spline2D
Set factory2D1temp=factory2D1
Set spline2D1 = factory2D1temp.CreateSpline(arrayOfObject1)


Refer to the help for the definition of more methods

CreateCircle
Creates and returns a 2D circle arc.

CreateClosedCircle
Creates and returns a closed 2D circle.

CreateClosedEllipse
Creates and returns a closed 2D ellipse.

CreateControlPoint
Creates and returns a 2D spline control point.

CreateEllipse
Creates and returns a 2D ellipse arc.

CreateHyperbola
Creates and returns a hyperbola.

CreateIntersection
Creates and returns the intersection of an object with the sketch.

CreateIntersections
Creates and returns the possible intersections of an object with the sketch.

CreateLine
Creates and returns a 2D line.

CreateLineFromVector
Creates and returns a 2D line.

CreateParabola
Creates and returns a parabola.

CreatePoint
Creates and returns a 2D point.

CreateProjection
Creates and returns the projection of an object on the sketch.

CreateProjections
Creates and returns the possible projections of an object on the sketch.

CreateSpline
Creates and returns a 2D b-spline.

Don't forget to use the macro recorder when you need a specific thing, it's a rough code but always useful.

Let's try a little crossover exercice between CATIA and Excel

Exercice :
You have an Excel table available which contain coordinates of points. Create a spline in CATIA V5 from this table.
Then create a circle : center (200,90) , radius = 22

Here for the excel file
Spoiler:

Sub splineexercice()
Dim CATIA As Object

On Error Resume Next
Set CATIA = GetObject("CATIA.Application")
If Err.Number <> 0 Then
Set CATIA = CreateObject("CATIA.Application")
CATIA.Visible = True
End If
On Error GoTo 0

Dim myDocument As Documents
Set myDocument = CATIA.Documents

Dim partDocument1 As partDocument
Set partDocument1 = myDocument.Add("Part")

Dim part1 As Part
Set part1 = partDocument1.Part

Dim hybridBodies1 As HybridBodies
Set hybridBodies1 = part1.HybridBodies

Dim hybridBody1 As HybridBody
Set hybridBody1 = hybridBodies1.Item("Geometrical Set.1")

Dim sketches1 As Sketches
Set sketches1 = hybridBody1.HybridSketches

Dim originelements1 As OriginElements
Set originelements1 = part1.OriginElements

Dim reference1 As Reference
Set reference1 = originelements1.PlaneXY

Dim sketch1 As Sketch
Set sketch1 = sketches1.Add(reference1)

Dim factory2D1 As Factory2D
Set factory2D1 = sketch1.OpenEdition

Dim i As Integer
i = 2

Dim arrayOfObject1(36)

Dim H As Single
Dim V As Single

While Worksheets("Feuil1").Range("A" & i) <> ""

H = Worksheets("Feuil1").Range("A" & i).Value
V = Worksheets("Feuil1").Range("B" & i).Value

Dim controlPoint2D1 As ControlPoint2D
Set controlPoint2D1 = factory2D1.CreateControlPoint(H, V)

Set arrayOfObject1(i - 1) = controlPoint2D1

i = i + 1

Wend

Dim spline2D1 As Spline2D
Set factory2D1temp = factory2D1
Set spline2D1 = factory2D1temp.CreateSpline(arrayOfObject1)

Dim circle2D1 As Circle2D
Set circle2D1 = factory2D1.CreateClosedCircle(200, 90, 22)

sketch1.CloseEdition

part1.Update

End Sub


Let's head to the Part Design workbench !

jeudi 2 mai 2013

CATIA Structure


What is the CATIA structure ?

The CATIA structure is quite complex and for this tutorial, 
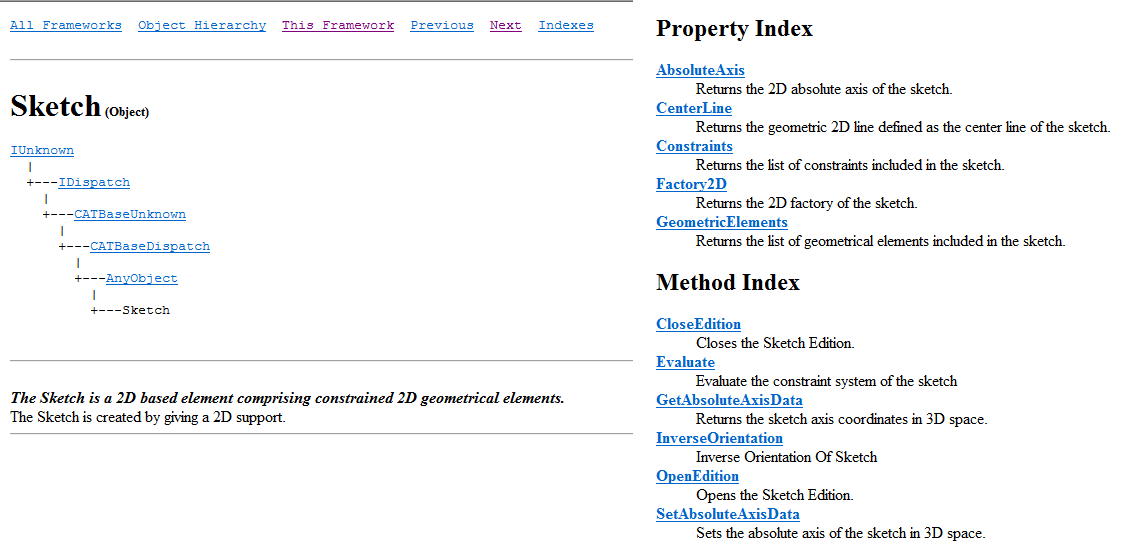
you need to open V5Automation.chm. On the first page you see this : 


As the color tells it, there are three types of objects in CATIA :
  • A collection : it's basically a liste of objects
  • An abstract object : you can't concretely create one but you need to define them
  • An object : an entity you can create it and work with it
As VBA is called an oriented-object programming language, it has a particular structure. And documents, parts, sketches, pocket, lines and points are represented as objects in VBA. we can distinct two ways for acting on objects : property and method.

Property : It's a characteristic of an object

Method : It's an action on an object

Take the example of a sketch :


For the property GeometricElements, if you've already defined a sketch named sketch1, you can type :

[...]
Dim geometricelements1 as GeometricElements
Set geometricelements1 = sketch1.GeometricElements
[...]

Notice that Set assign an object to a variable.

For the method OpenEdition, it's  :

[...]
Dim factory2D1 As Factory2D
Set factory2D1 = sketch1.OpenEdition
[...]

You didn't create another object with this method but just opened Sketcher.

Creating and opening a document :

Replace "Part" by "Product" or "Drawing" to have the corresponding document.
[...]
Dim partdocument1 As partdocument
Set pardocument1 = CATIA.Documents.Add("Part")
[...]

[...]
Dim partdocument1 As partdocument
Set partdocument1 = CATIA.Documents.Open("your_path\DocumentToOpen.CATPart")
[...]

Closing and saving a document :

There are three differents ways to use the Close function :
  • To close the active document
[...]
CATIA.ActiveDocument.Close
[...]
Be careful, this line will return an error if there is no active document.

  • To close a document assigned to a document1 variable
[...]
document1.Close
[...]
  • To close a document assigned to a name
[...]
CATIA.Documents.Item("Name").Close
[...]

Like the close function, there are three ways to save :

To save the active document : CATIA.ActiveDocument.Save
To save a Document assigned to a document1 variable : document1.Save
To save a Document assigned to a name : CATIA.Documents.Item(“Name”).Save


In addition, you can use the very useful function SaveAs
CATIA.ActiveDocument.SaveAs “your_path\MyNewName.your_extension”

Application exercice :
Create a macro that allow ou to open the sketch edition using the CATIA structure (fonction name_of_your_sketch.OpenEdition)

Notice that you can't delete your sketch. In fact you didn't closed the editor (even if you can't see it open)
Just delete the part now and add name_of_your_sketch.CloseEdition to your macro.

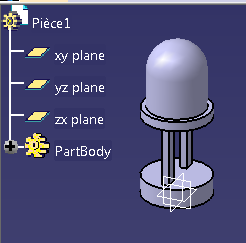
First choice : the sketch is in the body of your part.
Spoiler:
sub open_sketch_editor()
Dim CATIA As Object

'This part is always needed

On Error Resume Next
Set CATIA = GetObject("CATIA.Application")
If Err.Number <> 0 Then
 Set CATIA = CreateObject("CATIA.Application")
 CATIA.Visible=True
End if
On Error GoTo 0

'I follow the CATIA structure, first : introduce a documents type

Dim myDocument As Documents
Set myDocument As CATIA.documents

'Then add a new part/product/drawing document. Here it's a partdocument.

Dim partDocument1 As partDocument
Set partDocument1 = myDocument.Add("Part")

'Explicit the part

Dim part1 As part
Set part1=partDocument1.Part

'As the sketch is in the body of your part, I introduce a bodies type then a body

Dim bodies1 As Bodies
Set bodies1 = part1.Bodies

Dim body1 As Body
Set body1 = bodies1.Item("MainBody")

'Like the others, we have to intoduce the collection sketches before the sketch

Dim sketches1 As Sketches
Set sketches1 = body1.Sketches

'Set the origin

Dim originelements1 As OriginElements
Set originelements1 = part1.OriginElements

'I choose the XY plane (to choose another reference plane, just replace by YZ or ZX)

Dim reference1 As Reference
Set reference1 = originelements1.PlaneXY

'Finally we can create the sketch !

Dim sketch1 As Sketch
Set sketch1 = sketches1.Add(reference1)

'And use the fonction OpenEdition() (no argument needed but a fonction has always ()

sketch1.OpenEdition()

'Don't forget to close your sketch editor !

sketch1.CloseEdition()

'It's useful to update the part after modifying it

part1.Update

End sub

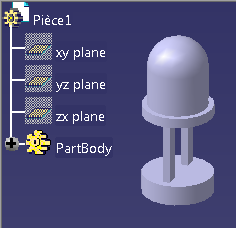
Second choice : the sketch is in a Geometrical Set
Spoiler:
sub open_sketch_editor()
Dim CATIA As Object

'This part is always needed

On Error Resume Next
Set CATIA = GetObject("CATIA.Application")
If Err.Number <> 0 Then
 Set CATIA = CreateObject("CATIA.Application")
 CATIA.Visible=True
End if
On Error GoTo 0

'I follow the CATIA structure, first : introduce a documents type

Dim myDocument As Documents
Set myDocument As CATIA.documents

'Then add a new part/product/drawing document. Here it's a partdocument.

Dim partDocument1 As partDocument
Set partDocument1 = myDocument.Add("Part")

'Explicit the part

Dim part1 As part
Set part1=partDocument1.Part

'As the sketch is in the geometrical set, I introduce a hybridbodies type then a hybridbody

Dim hybridBodies1 As HybridBodies
Set hybridBodies1 = part1.HybridBodies

Dim hybridBody1 As HybridBody
Set hybridBody1 = hybridBodies1.Item("Geometrical Set.1")

'Like the others, we have to intoduce the collection sketches before the sketch

Dim sketches1 As Sketches
Set sketches1 = body1.Sketches

'Set the origin

Dim originelements1 As OriginElements
Set originelements1 = part1.OriginElements

Dim reference1 As Reference
Set reference1 = originelements1.PlaneXY

'I create the sketch

Dim sketch1 As Sketch
Set sketch1 = sketches1.Add(reference1)

sketch1.OpenEdition()

'Again don't forget to close your sketch editor !

sketch1.CloseEdition()

part1.Update

End sub

Before looking at the next articles I have to talk about the macro recording tool. See what the macro recording records :


Sub CATMain()

Dim partDocument1 As PartDocument
Set partDocument1 = CATIA.ActiveDocument

Dim part1 As Part
Set part1 = partDocument1.Part

Dim hybridBodies1 As HybridBodies
Set hybridBodies1 = part1.HybridBodies

Dim hybridBody1 As HybridBody
Set hybridBody1 = hybridBodies1.Item("Geometrical Set.1")

Dim sketches1 As Sketches
Set sketches1 = hybridBody1.HybridSketches

Dim originElements1 As OriginElements
Set originElements1 = part1.OriginElements

Dim reference1 As Reference
Set reference1 = originElements1.PlaneXY

Dim sketch1 As sketch
Set sketch1 = sketches1.Add(reference1)

Dim arrayOfVariantOfDouble1(8)
arrayOfVariantOfDouble1(0) = 0#
arrayOfVariantOfDouble1(1) = 0#
arrayOfVariantOfDouble1(2) = 0#
arrayOfVariantOfDouble1(3) = 1#
arrayOfVariantOfDouble1(4) = 0#
arrayOfVariantOfDouble1(5) = 0#
arrayOfVariantOfDouble1(6) = 0#
arrayOfVariantOfDouble1(7) = 1#
arrayOfVariantOfDouble1(8) = 0#
Set sketch1Variant = sketch1
sketch1Variant.SetAbsoluteAxisData arrayOfVariantOfDouble1

part1.InWorkObject = sketch1

Dim factory2D1 As Factory2D
Set factory2D1 = sketch1.OpenEdition()

Dim geometricElements1 As GeometricElements
Set geometricElements1 = sketch1.GeometricElements

Dim axis2D1 As Axis2D
Set axis2D1 = geometricElements1.Item("AbsoluteAxis")

Dim line2D1 As Line2D
Set line2D1 = axis2D1.GetItem("HDirection")

line2D1.ReportName = 1

Dim line2D2 As Line2D
Set line2D2 = axis2D1.GetItem("VDirection")

line2D2.ReportName = 2

sketch1.CloseEdition

part1.InWorkObject = hybridBody1

part1.Update

End Sub


There are minor differences.
First : the recorder used the command ActiveDocument. I don't recommended to use this method or whith high precaution. In fact there is a high chance that you have another document which is open in CATIA. So the macro could take another document as ActiveDocument.

It defined a safe arr : arrayOfVariantOfDouble1 You don't need them, for the moment, to have a working code. A safe array can stock variables like arrays in other programming languages. However they have to have a type (like Double, Object...) A example will be showed later.

part1.InWorkObject = sketch1 is optional

Dim factory2D1 As Factory2D
Set factory2D1 = sketch1.OpenEdition()
Factory2D is an object, which contains all the methods of Sketcher Workbench. Look at the help for the exhaustice list of methods.

The axis are automatically set so you don't need to introduce them like the macro recorder do.

The macro recorder autorename the elements with, for example, line2D1.ReportName = 1 ,but you didn't have to do it and simply use the name line2D1.  

You have certainly noticed that this macro did only create a sketch and no more. The next step is to modify this sketch.

Next article : 3.Modifying a sketch